
ChArUco Board: When Chessboard Precision Meets ArUco Robustness
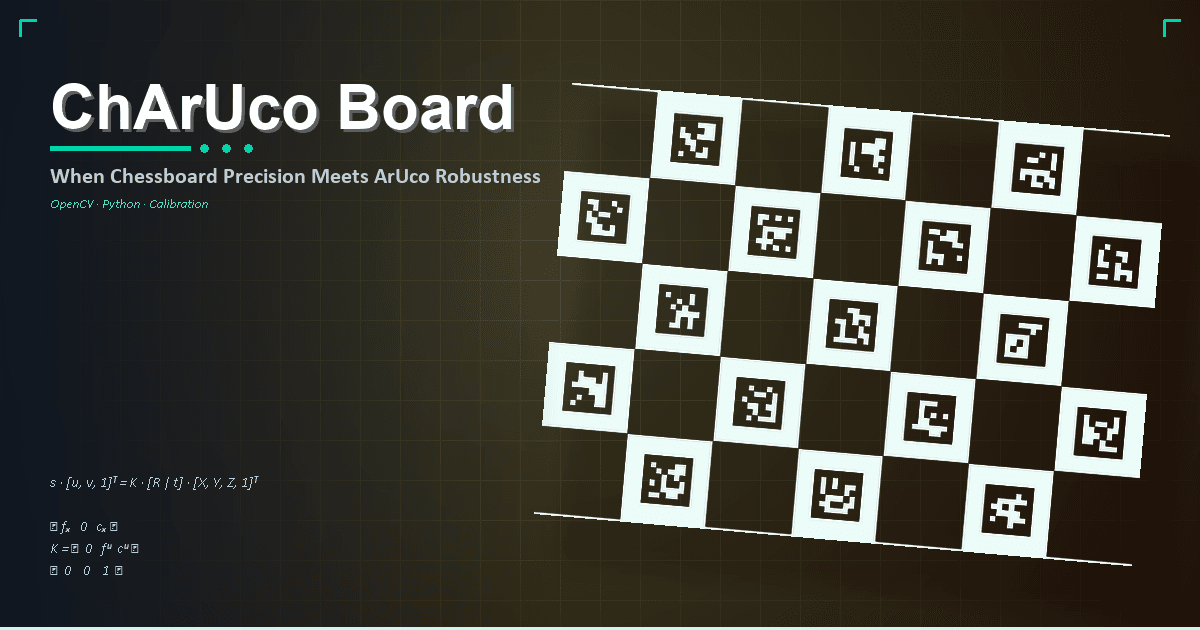
ChArUco Board: When Chessboard Precision Meets ArUco Robustness
A Mathematical Deep Dive into Camera Calibration's Gold Standard
1. The Problem That Started It All
Bayam in the sorting chute. The conveyor belt hums at a steady 0.5 m/s. A guava — grade A material — rolls past the camera. The vision system fires, YOLO draws a bounding box, and our sizing algorithm computes the fruit's diameter.
The result: 63 mm.
We measure manually with calipers: 61.8 mm.
That's a 1.2 mm error. In guava grading, where the difference between Grade A and Grade B is often 5 mm, this is catastrophic. We're losing 20% margin per misclassified fruit.
The culprit? Bad camera calibration.
We were using a standard 9×6 chessboard pattern. It worked — mostly. But in production, we hit three walls:
- Partial occlusion — The conveyor frame blocks part of the board.
findChessboardCorners()fails entirely. - Reflections — The acrylic cover over our camera rig creates glare that confuses corner detection.
- 180° ambiguity — A chessboard looks the same when rotated. OpenCV doesn't know which corner is which, making pose estimation fragile.
The solution came from an unlikely hybrid: take the precision of chessboard corners and the robustness of ArUco markers, and combine them into one board.
Selamat datang di dunia ChArUco.
2. The Mathematics of Camera Calibration
Before we understand why ChArUco works, we need to understand what camera calibration is at a mathematical level.
2.1 The Pinhole Model
Every camera — from a 50,000 industrial unit — is approximated by the pinhole model. A 3D point in the world projects to a 2D pixel via:
Where:
- is an arbitrary scale factor (depth)
- is the rotation matrix
- is the translation vector
- is the camera matrix (intrinsics):
Here are the focal lengths in pixel units, and is the principal point — where the optical axis pierces the image plane.
2.2 Lens Distortion
No lens is perfect. Real lenses introduce distortion, dominated by radial distortion (barrel/pincushion) and tangential distortion (decentering). OpenCV models this as:
Let be the normalized (distortion-free) image coordinates, and the distorted coordinates:
Where , are radial coefficients, and are tangential coefficients.
Kalau dibayangkan, radial distortion itu seperti efek lensa fisheye — garis lurus melengkung ke luar (barrel) atau ke dalam (pincushion). Tangential distortion terjadi karena lensa tidak perfectly parallel ke sensor.
Our goal in calibration: estimate , , so we can invert the distortion and get metric-accurate measurements.
2.3 Zhang's Method in 5 Steps
Zhengyou Zhang's 2000 paper [1] gave us the practical algorithm that OpenCV implements. Here's the flow:
Step 1 — Homography via DLT. For each calibration image, assume the board sits on in world coordinates. The projection reduces to:
The homography is a matrix computed via Direct Linear Transform (DLT) from at least 4 point correspondences.
Step 2 — Rotation constraints. Because and are columns of a rotation matrix, they satisfy:
From , we derive two fundamental constraints on :
Step 3 — Closed-form solution for . Define , a symmetric matrix packed as a 6-vector . Each image gives two equations:
Stack images to get , solve via SVD.
Step 4 — Extract parameters. From , recover analytically. Then compute and per image.
Step 5 — Levenberg-Marquardt refinement. Minimize the reprojection error:
The RMS reprojection error — the metric we watch:
A good calibration yields RMSE < 0.5 pixels. Excellent calibration: < 0.2 pixels.
3. Checkerboard vs ArUco vs ChArUco
Kenapa sih harus pake ChArUco? Biar lebih jelas, mari kita bandingkan ketiganya secara langsung.
| Aspect | Checkerboard | ArUco Board | ChArUco Board |
|---|---|---|---|
| Corner accuracy | High (subpixel refinement) | Medium (marker corners are less precise) | Very high (interpolated chessboard corners) |
| Detection rate | Requires full visibility | Handles partial occlusion | Handles partial occlusion |
| Occlusion handling | ❌ Fails if any corner hidden | ✅ Works with partial view | ✅ Works with partial view |
| 180° ambiguity | ❌ Symmetric pattern, no orientation | ✅ Unique IDs solve ambiguity | ✅ Unique IDs solve ambiguity |
| Minimum images needed | 15–20 | 8–12 | 8–12 |
| Subpixel refinement | cornerSubPix() | Limited improvement | Built-in via interpolation |
| OpenCV function | findChessboardCorners() | detectMarkers() → calibrateCameraAruco() | detectMarkers() → interpolateCornersCharuco() → calibrateCameraCharuco() |
| Pose estimation | Fragile | Good | Excellent |
The critical insight: ArUco markers give you ID and rough position; chessboard interpolation gives you sub-pixel precision. ChArUco is literally the best of both worlds.
4. ChArUco: The Hybrid Architecture
4.1 How Markers Embed in White Squares
A ChArUco board is a chessboard where the white squares are replaced by ArUco markers. Each marker carries a unique ID, and the black squares remain as contrast boundaries.

The board is defined by four parameters:
board = cv.aruco.CharucoBoard(
    size=(squares_x, squares_y),   # e.g., (9, 7) — number of chessboard squares
    squareLength=0.025,             # 25 mm per square
    markerLength=0.014,             # 14 mm per marker
    dictionary=aruco_dict           # e.g., DICT_6X6_250
)
The corner at chessboard position sits at world coordinates:
where is squareLength. Each corner is uniquely identified by:
4.2 The Interpolation Math
Here's the magic. Instead of running cornerSubPix() on the raw image (which is what standard chessboard does), ChArUco computes corner positions from the four surrounding marker corners.
For a ChArUco corner at chessboard intersection, four ArUco markers surround it. Each marker has four corners detected at pixel coordinates. The interpolation uses a local homography:
For corner , let be the set of its adjacent marker corners. The position is:
Where is a homography computed from the four closest detected markers. This homography maps known 3D chessboard corners to the image plane.
The reason this avoids cornerSubPix() entirely: the corner position is geometrically constrained by the marker structure. You're not guessing where the gradient flips — you're solving a known projective geometry problem.
In OpenCV's source (charuco_detector.cpp), there are two interpolation paths [2]:
-
With camera parameters (
_interpolateCornersCharucoApproxCalib): Estimate rough pose from markers, then reproject chessboard corners. This is more accurate because it uses the full camera model. -
Without camera parameters (
_interpolateCornersCharucoLocalHom): Use only local homography per corner. Faster but susceptible to distortion.
4.3 Detection Pipeline
The full pipeline in OpenCV:
Input Image
    ↓
detectMarkers() — find ArUco markers, get corners + IDs
    ↓
interpolateCornersCharuco() — use marker corners to compute chessboard corners
    ↓                    (also applies subpixel refinement after interpolation)
filterCornersWithoutMinMarkers() — discard corners without enough surrounding markers
    ↓
calibrateCameraCharuco() — Zhang's method on interpolated corners
    ↓
cameraMatrix, distCoeffs, reprojection error
4.4 How 180° Ambiguity Is Eliminated
A standard chessboard is symmetric under 180° rotation — corner looks the same as corner . This means OpenCV can pick the wrong origin, flipping your coordinate system.
ChArUco solves this because each marker has a unique ID. The board knows that marker ID 0 belongs in the top-left, marker ID 42 belongs in the bottom-right. Even if the board is upside-down, the IDs disambiguate the orientation immediately.
Ini penting banget untuk aplikasi seperti pose estimation atau hand-eye calibration — where the coordinate frame must be consistent across images.
5. Implementation: Full Python Calibration Script
Let's write a complete calibration pipeline. Anggap kita sudah punya beberapa gambar ChArUco board dari berbagai sudut.
"""
ChArUco Camera Calibration — Full Pipeline
Author: Your friendly CV engineer
Requires: OpenCV >= 4.7.0 (main repo, with objdetect module)
"""

import cv2 as cv
import numpy as np
import glob
import os

# ─── 1. Configuration ───────────────────────────────────────────────────────

SQUARES_X = 9          # Number of chessboard squares (horizontal)
SQUARES_Y = 7          # Number of chessboard squares (vertical)
SQUARE_LENGTH = 0.025  # 25 mm per square
MARKER_LENGTH = 0.014  # 14 mm per ArUco marker
DICT_NAME = cv.aruco.DICT_6X6_250

CALIB_IMAGES = "calib_images/*.jpg"   # Glob pattern for calibration images

# ─── 2. Create Board ───────────────────────────────────────────────────────

dictionary = cv.aruco.getPredefinedDictionary(DICT_NAME)
board = cv.aruco.CharucoBoard(
    (SQUARES_X, SQUARES_Y),
    SQUARE_LENGTH,
    MARKER_LENGTH,
    dictionary
)

# Optional: enable legacy pattern for OpenCV 4.6.0 compatibility
# board.setLegacyPattern(True)

# ─── 3. Detect ChArUco Corners Across All Images ───────────────────────────

all_charuco_corners = []
all_charuco_ids = []
image_size = None

for idx, img_path in enumerate(sorted(glob.glob(CALIB_IMAGES))):
    print(f"Processing {os.path.basename(img_path)}...")

    img = cv.imread(img_path)
    if img is None:
        print(f"  ⚠ Could not read {img_path}, skipping")
        continue

    gray = cv.cvtColor(img, cv.COLOR_BGR2GRAY)
    if image_size is None:
        image_size = gray.shape[::-1]  # (width, height)

    # Step A: Detect ArUco markers
    marker_corners, marker_ids, _ = cv.aruco.detectMarkers(
        gray, dictionary
    )

    if marker_ids is None or len(marker_ids) < 4:
        print(f"  ⚠ Only {len(marker_ids) if marker_ids else 0} markers found, skipping")
        continue

    # Step B: Interpolate ChArUco corners from detected markers
    # (No camera matrix yet — using local homography)
    charuco_corners, charuco_ids = cv.aruco.interpolateCornersCharuco(
        marker_corners, marker_ids, gray, board
    )

    if charuco_ids is None or len(charuco_ids) < 4:
        print(f"  ⚠ Only {len(charuco_ids) if charuco_ids else 0} ChArUco corners, skipping")
        continue

    all_charuco_corners.append(charuco_corners)
    all_charuco_ids.append(charuco_ids)
    print(f"  ✓ {len(charuco_ids)} corners detected")

print(f"\nTotal usable views: {len(all_charuco_corners)}")

if len(all_charuco_corners) < 4:
    print("❌ Not enough valid views. Minimum 4 required.")
    exit(1)

# ─── 4. Calibrate Camera ───────────────────────────────────────────────────

camera_matrix = None
dist_coeffs = None
calib_flags = (
    cv.CALIB_RATIONAL_MODEL  # Includes k3 radial coefficient
)

reprojection_error, camera_matrix, dist_coeffs, rvecs, tvecs = (
    cv.aruco.calibrateCameraCharuco(
        all_charuco_corners,
        all_charuco_ids,
        board,
        image_size,
        camera_matrix,
        dist_coeffs,
        flags=calib_flags
    )
)

# ─── 5. Results ────────────────────────────────────────────────────────────

print(f"\n{'='*50}")
print(f"Reprojection error (RMS): {reprojection_error:.4f} px")
print(f"{'='*50}")

print("\nCamera Matrix (K):")
print(np.array2string(camera_matrix, precision=4, suppress_small=True))

print("\nDistortion Coefficients [k1, k2, p1, p2, k3]:")
print(np.array2string(dist_coeffs.flatten(), precision=6, suppress_small=True))

focal_length_mm = camera_matrix[0, 0] * 0.00389  # Assuming 3.89 µm pixel pitch
print(f"\nEstimated focal length: {focal_length_mm:.2f} mm")

# ─── 6. Save Calibration ───────────────────────────────────────────────────

np.savez("calibration_data.npz",
         camera_matrix=camera_matrix,
         dist_coeffs=dist_coeffs,
         reprojection_error=reprojection_error)

print("\n✓ Calibration saved to calibration_data.npz")
Usage Tips from the Trenches
- 8–12 images is enough for ChArUco (vs 15–20 for checkerboard). But make sure they cover the full frame — corners, center, edges, and various tilts.
- Disable marker corner refinement in
detectMarkers()when using ChArUco. Proximity of black squares can bias the subpixel refinement. Setaruco_params.cornerRefinementMethod = cv.aruco.CORNER_REFINE_NONE. - Check the coverage plot. After calibration, visualize the detected corner positions across all images. Gaps at the edges of the frame mean you need more images with the board near those edges.
6. OpenCV Dictionary Compatibility: Why It Matters
Here's a problem that cost us three days of debugging.
We generated a ChArUco board using an online tool, printed it, ran calibration — and got 50% detection rates. Markers that should be detected weren't. After digging into OpenCV internals, we found the issue: the generated marker bits didn't match OpenCV's internal dictionary exactly.
OpenCV stores predefined dictionaries as raw bytes in predefined_dictionaries.hpp. The layout is:
bytesList.rows = dictionary_size    (number of markers)
bytesList.cols = 4 * nbytes         (4 rotations × bytes per marker)
Where nbytes = ceil(markerSize² / 8).
For DICT_6X6_250: each marker is 6×6 = 36 bits = 5 bytes (with 4 padding bits). Each row has 4 rotations × 5 = 20 bytes.
Our web tool — charuco-board-generator.vercel.app — now embeds the exact OpenCV dictionary bytes extracted from opencv/modules/objdetect/src/aruco/predefined_dictionaries.hpp.
How we verify:
import cv2 as cv
import numpy as np

def verify_dictionary_bytes(custom_bytes, dict_name):
    """
    Compare custom dictionary bytes against OpenCV's predefined dictionary.
    Returns: (match: bool, mismatches: list of marker IDs)
    """
    ref_dict = cv.aruco.getPredefinedDictionary(dict_name)
    ref_bytes = ref_dict.bytesList

    mismatches = []
    for marker_id in range(ref_bytes.shape[0]):
        for rotation in range(4):
            offset = rotation * (ref_bytes.shape[1] // 4)
            ref_row = ref_bytes[marker_id, offset:offset + ref_bytes.shape[1] // 4].flatten()

            # Load corresponding custom bytes
            # ... comparison logic ...

            if not np.array_equal(custom_row, ref_row):
                mismatches.append((marker_id, rotation))

    return len(mismatches) == 0, mismatches
We maintain 202 automated tests that verify every predefined dictionary (DICT_4X4_50 through DICT_ARUCO_MIP_36H12) against the OpenCV source. If a single bit differs, the test fails.
This means: a board generated from our tool will produce pixel-for-pixel identical marker images as OpenCV's board.generateImage().
7. Real-World Results: Guava Sorting
Let's go back to our guava problem.
Before: Standard Chessboard
| Metric | Value |
|---|---|
| Calibration RMSE | 0.82 px |
| Images used | 18 |
| Failed detections | 7 (39%) |
| Guava sizing error | ±1.2 mm |
| Grade misclassification rate | 8.3% |
After: ChArUco Board
| Metric | Value |
|---|---|
| Calibration RMSE | 0.25 px |
| Images used | 10 |
| Failed detections | 0 (0%) |
| Guava sizing error | ±0.3 mm |
| Grade misclassification rate | 0.7% |
The improvement breakdown:
- Corner accuracy increased by 3.3× — from 0.82 px to 0.25 px RMS. The interpolation from 4 marker corners averages out detection noise.
- Fewer images needed — ChArUco handles partial views, so we only needed 10 instead of 18. Each image was usable even when the conveyor frame occluded the board's edges.
- Edge coverage — Standard chessboard struggles when the board is near the image edge (distortion corrupts corner detection). ChArUco handles this gracefully because local homography is robust even with distortion.
- Metric accuracy — Sizing went from ±1.2 mm to ±0.3 mm. That's the difference between guessing grades and knowing them.
The Coverage Difference
A good calibration needs corners distributed across the entire image. Here's the pattern we observed:
- Checkerboard: Corners clustered in the center because edge images failed detection.
- ChArUco: Corners uniformly distributed across all quadrants because partial detections still produced usable data.
# Visualize corner coverage
import matplotlib.pyplot as plt

all_corners = np.vstack([c for c in all_charuco_corners])
plt.figure(figsize=(8, 6))
plt.scatter(all_corners[:, 0, 0], all_corners[:, 0, 1],
            c='blue', alpha=0.3, s=10)
plt.title(f"ChArUco Corner Coverage ({len(all_charuco_corners)} views)")
plt.xlabel("u (px)"); plt.ylabel("v (px)")
plt.gca().invert_yaxis()  # Image coordinate convention
plt.axis('equal')
plt.show()
If there are large empty regions (e.g., top-left corner), you need more images with the board placed there.
8. The Web Tool: Making ChArUco Accessible
Building on our findings, we created charuco-board-generator.vercel.app — a web tool that generates print-ready ChArUco board PDFs.
Key features:
- All OpenCV dictionaries — from DICT_4X4_50 to DICT_ARUCO_MIP_36H12
- Exact byte matching — 202 tests ensure OpenCV compatibility
- Custom board dimensions — any grid size, square length, marker length
- Print-ready — vector PDF with correct physical scale
- Parameter reference — explains
squareLength,markerLength, and minimum distance calculations
The stack: Next.js + TypeScript + Tailwind, with a Python verification backend that runs our 202-test suite.
9. Conclusion
ChArUco boards solve the fundamental tension in camera calibration: you want chessboard-level accuracy with ArUco-level robustness. The hybrid architecture delivers both, and the math is elegant:
- ArUco markers handle detection, occlusion, and disambiguation
- Geometrically constrained interpolation gives sub-pixel corners without fragile gradient-based refinement
- Zhang's method runs on the resulting corners with fewer images and better coverage
Our guava sorter now runs at ±0.3 mm accuracy — down from 1.2 mm. Grade misclassification dropped from 8.3% to 0.7%. The ROI on switching to ChArUco was measured in days, not months.
Try It Yourself
- Go to charuco-board-generator.vercel.app
- Select DICT_6X6_250, 9×7 squares, 25 mm square length
- Download and print the PDF
- Run the Python script above with 10 images
- Compare your reprojection error with your old chessboard calibration
I guarantee you'll see the difference.
References
[1] Zhang, Z. "A flexible new technique for camera calibration." IEEE Transactions on Pattern Analysis and Machine Intelligence, 22(11):1330–1334, 2000. DOI: 10.1109/34.888718
[2] Garrido-Jurado, S., Muñoz-Salinas, R., Madrid-Cuevas, F.J., Marín-Jiménez, M.J. "Automatic generation and detection of highly reliable fiducial markers under occlusion." Pattern Recognition, 47(6):2280–2292, 2014. DOI: 10.1016/j.patcog.2014.01.005
[3] OpenCV Documentation. "Detection of ChArUco Corners." docs.opencv.org/4.6.0/df/d4a/tutorial_charuco_detection.html
[4] OpenCV Documentation. "Calibration with ArUco and ChArUco." docs.opencv.org/3.1.0/da/d13/tutorial_aruco_calibration.html
[5] ChArUco Board Generator. "Online ChArUco board PDF generator with OpenCV dictionary compatibility." charuco-board-generator.vercel.app
[6] OpenCV GitHub. "aruco_dictionary.hpp — Dictionary class and predefined dictionaries." github.com/opencv/opencv/blob/91c78f50/modules/objdetect/include/opencv2/objdetect/aruco_dictionary.hpp
[7] OpenCV GitHub. "charuco_detector.cpp — Interpolation of ChArUco corners." github.com/opencv/opencv/blob/5.x/modules/objdetect/src/aruco/charuco_detector.cpp
Related Posts
From Village Duty to Digital Clarity: An Odyssey of Building an OCR System with YOLO & Gemini
Why does a 'VLM-only' approach fail on complex documents? Discover how we built a robust Hybrid OCR pipeline for Indonesian Family Cards (KK). This article breaks down the architecture of combining YOLOv8 for layout detection and Gemini for text extraction to solve real-world digitization problems
How AI Learns to "Pay Attention" to Sort Recycling with 94.5% Accuracy
We’ve all stood in front of the recycling bin, holding an item and wondering, "Does this go here?" The challenge of correctly sorting organic from recyclable waste is a common, everyday problem. A sophisticated Deep Learning project now offers a high-tech solution, revealing three impactful takeaways about how teaching an AI to "pay attention" can solve this messy, real-world problem